Padded Hangers 2.0: Revamping Storage for Fitted Jackets
Written by Priscilla Lo, Textiles & Fashions intern from Fleming College, under the supervision of Kristiina Lahde (Textiles & Fashions collection technician) and Karla Livingston (Textiles & Fashions senior technician)
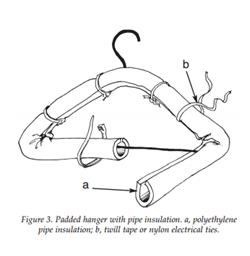
Hanging storage is a common method of housing garments within textile collections. Typically, padded hangers are created to provide adequate support without causing extra stress to the textile. In the Textiles and Fashions department, padded hangers are created by covering wire hangers with polyethylene pipe insulation, secured in place with nylon electrical ties. A muslin slip covers the insulation and acts as a guard to protect the garment from abrasion. This type of hanger is made according to standards set out by the Canadian Conservation Institute (CCI), as described in CCI Notes 13/5: Hanging Storage for Costumes.
")
The ROM recently acquired 6 fitted jackets by the designer Martin Margiela. These jackets were hung on the polyethylene wire hangers as described above. Although this type of hanger provides enough stability, it was thought that additional support could be added by creating padded forms for the body and arms that would fit over the polyethylene wire hangers. Forms would be cut to an average size and could be easily adjusted to fit different sizes of jackets. If needed, more padding could be added to the form to provide increased support.
Step 1: Creating the Patterns
")
A 28” torso pattern was created by the Textiles and Fashions’ collection technician, Kristiina Lahde, for the body. A neck piece was incorporated to cover the wire twist of the hanger, reducing any risk of snagging. The torso is slightly cinched to create a waistline.
A 27” sleeve pattern was adapted from the men’s sleeve pattern in A Practical Guide to Costume Mounting.

Once the patterns were created, sheets of muslin were cut following the patterns. 20 body-form hangers were needed; therefore, 40 pieces of the torso pattern were cut (front and back piece) and 20 pieces of each arm (left and right) were cut.
")
Step 2: Sewing the Patterns
Patterns were sewn according to seam allowances and the requirements of the pattern (shoulder and elbow darts for the sleeve pattern).
")
For the sleeves, a zig zag stitch was sewn following the opening of the sleeve to prevent thread unrevealing. Two pieces of 16” twill tape were sewn onto the inside of the sleeve, each 1.5” away from the shoulder dart. The twill tapes would be used to secure the arms to the torso, allowing the length of the arms to be adjusted based on how long the twill tape is tied. \
")
After seams were all sewn, they were steam ironed to ensure that they were flat and to the appropriate shape.
")
Step 3: Stuffing the Patterns
Polyester batting was used to stuff the patterns. For the torso, batting was cut to be 0.5” shorter from the bottom of the pattern. No fill was used for the neck portion. Batting was sewn along the top of the torso, leaving a two inch space in the centre for the hanger to go through.
Batting for the sleeves was cut to be 2” shorter from the top of the pattern. The 2” absence of batting from the top accommodates for the padding from the torso, ensuring that the shoulders do not get too bulky.
")
")
Step 4: The Finished Product
")
The finished hangers provide support to the torso and the arms of the jacket while maintaining structural integrity. The extra material hanging past the jacket is beneficial because it ensures that the edges of the jacket are protected as well.
Resources:
Canadian Conservation Institute. CCI Notes 13/5: Hanging Storage for Costumes, 2009. Web. https://www.cci-icc.gc.ca/resources-ressources/ccinotesicc/13-5_e.pdf. Accessed November 17, 2015.
Flecker, Lara. A Practical Guide to Costume Mounting. Oxford: Butterworth-Heinemann. 2007.