Activity: Painted Pottery


Category
Duration
Audience
Age
Grades
About
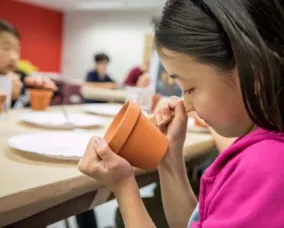
Learn about ancient Greek pottery, then use your art-smarts to create your own Greek-inspired black- or red-figure pottery.
Getting Started
The ancient Greeks made and used ceramics for almost every aspect of life. Different ceramics, such as pottery, came in different shapes and sizes that could be used for cooking, as storage containers, to eat and drink from, for weddings, and even for funerals. The pottery was made from terracotta, a fired clay, that was molded into different shapes using a pottery wheel depending on what the potter was making the piece for. This hydria was created to help collect, carry, store, and pour water. A hydria has three handles: one that would help the user pour, and two others that would be used to carry the full jug. You can’t see it in this picture, but this hydria has a beautiful pattern on the other side.

Context
Learning Goals
- Understand why the ancient Greeks made pottery.
- Explore how ancient Greek pottery was made.
- Create an ancient Greek-inspired piece of pottery using historical knowledge and personal inspiration
Background Information
Because pottery was such an important aspect of daily life in ancient Greece, it evolved from something strictly functional to something that could be decorative as well. This means that people could purchase different ceramic items with different drawings, styles, or themes depending on what the piece was made for and what they wanted to display in their homes. Popular designs included figures or stories from Greek myths, animals, and patterns.
These designs were made using popular techniques, such as creating black-figure or red-figure pottery. To make black-figure pottery, a potter would create the shape of the vessel -- an amphora, hydria, plate, etc. -- by throwing it on a pottery wheel. After the physical vessel was created, the potter would put the pot in the kiln for a first firing, before applying any designs. Let’s look at an example from the ROM’s online collection.

This amphora would have been fired in a kiln and then, using a slip, the design would be “painted” on it using thin and thick brushes to create the design. In some spots, where delicate details were required, a stylus or thin scriber would be used to incise or scratch a thin line through the applied slip before firing a second time. Slip is a paint-like, liquid clay made out of very fine, thin grained clay. Originally, potters would use slip to make weaker areas of a piece of pottery stronger. They noticed that the places where they put the slip would turn black after being in the kiln. By using slip, a potter could control how the finished picture or pattern would appear after the piece had been placed in the kiln. The images painted would appear black on a red background.
For the slip to turn black in production, there were three steps:
- Oxygen had to be let into the kiln through the vents to begin the clay baking process.
- Green wood was added to the kiln and the vents were closed. This would make the entire piece turn black.
- Oxygen was reintroduced, turning the vase red again except in the areas that the slip was applied. Those areas stayed black.
When the pottery cooled, details were added using red and/or white paint. Red-figure pottery was another popular decoration style that emerged in ancient Greece. It was created using the same process as black-figure pottery, except the slip was used to outline the figures or subject matter, making the images appear red on a black background.
Materials & preparation
Materials
- Clay pots
- Paintbrushes
- Paint palettes
- Toothpicks, plastic knives, coffee mixing sticks to scratch fine lines through drying paint (just like the ancient Greek vase painters would have done!)
- Black, red, and white acrylic or tempera paint
- Pencil
- Erasers
- Table cover
- Cup of water (to clean brushes)
Preparation
- Cover tables or work surfaces with paper or cloth.
- You may want to have students wear smocks, especially if using acrylic paints.
- When choosing paints: acrylic gives sharper images and is used in our demonstration activity, but will not wash out of fabrics; tempera needs to be used with as dry a brush as possible and a sealing layer should be applied when dry.

Tips
Helpful Tips:
- The smaller the brush you use, the finer the details you will be able to make.
- Try to use as little water as possible when painting and dry your brush in between rinses. This will stop the colour from sinking into the pottery and blurring.
Safety Notes:
Acrylic paint does not wash out of clothes. Be careful when painting with it, and use a smock if you need to.
Dig Deeper
Follow-Up
- What were the challenges you faced while painting your pot?
- Did you have any difficulty deciding where to put which colour paint? Why or why not?
- Do you think it would be harder to create black-figure or red-figure pottery? Why?
- The ancient Greeks used pottery in almost all aspects of daily life. How do you plan to use your pot?
Teacher Reflection
Do the participant's answers reflect a basic understanding of how black- and red-figure pottery are created and the basic components of pottery making? Do the participant’s answers reflect an understanding of how and why the ancient Greeks made pottery?
Extension Activities
Both the Greek and Roman early societies prized objects that were both beautiful and useful. Learn how the Romans helped beautify their spaces by checking out our ROMan Mosaics activity.
Glossary
Amphora: A tall Roman or Greek jar with a narrow neck and two handles.
Black-figure pottery: A type of Ancient Greek pottery where ceramics fired with the figures of the pottery taking on a black hue, dating to 7th to 5th centuries BCE.
Hydria: A jug or container used to help collect, carry, store, and pour water. A hydria has three handles: one that would help the user pour, and two others that would be used to carry the full jug.
Plate: A flat dish, typically used to serve food or hung up for display.
Pottery: Things made out of baked clay, ceramic. The hydria, amphora, and plate mentioned within this activity are all examples of pottery items.
Pottery wheel: A machine used for circular shaping (also known as throwing) of different types of clay to make pottery or ceramics.
Red-figure pottery: A type of Ancient Greek ceramic fired with the background of the pottery taking a black hue. The figures appear red. Dating to the 6th to 3rd centuries BCE.
Slip: A paint-like, liquid clay made out of very fine, thin grained clay.
Terracotta: A type of earthenware ceramic made of clay that is fired in a kiln at a relatively low temperature resulting in a typically brownish-red/ brownish-orange colour. Terracotta is Latin for baked earth.


